A Raspberry Pi’s low-cost and wide availability makes it a great choice for prototyping and developing embedded Linux systems. Flashing an OS, and installing the required packages to run your application code is typically just an apt install away.
However, how do you take that prototype and create a clean and production-ready system? Where you can be confident it will have the correct dependencies, hardware security features configured correctly and that each device is set up consistently? Recently, Raspberry Pi released rpi-image-gen and rpi-sb-provisioner to help bridge this gap.
In this post, we’ll look at what these tools are and how to use them to create an example system.
Building custom images with rpi-image-gen
Unlike their existing tool pi-gen (used to create Raspberry Pi OS), rpi-image-gen combines descriptive profiles, image layout and configuration YAML files to create Debian-based Linux images using mmdebstrap.
Profiles are used to group together sets of Debian packages and commands to be run during installation. These sets can be parameterised and selectively picked by your configs to build up a complete system. Image layouts describe how the binary image will be created and physically laid out on-disk. So the types of filesystems, partition table entries, output formats etc are set up here.
A configuration is your top-level file. They are typically associated with the underlying hardware, and where attributes for the final image can be set. For example, you could have a production & development configuration, where the development configuration expands the root filesystem space and includes your “debug” profile bundle to include debugging packages.
Rather than building from source every time, rpi-image-gen defaults to using pre-built binaries. By taking this approach, you gain speed (builds take minutes, not hours) and reduce overall maintenance as security updates can be managed by just pulling the latest packages. It is still possible to build custom packages (like a custom kernel) but these steps are typically handled before rpi-image-gen.
Once the filesystem content is finalised, Syft is used to generate an SBOM for security auditing. This is vital in keeping track of exactly what is installed on the final target, as well as for feeding into external CVE scanning tools.
Kiosk Example
To see it in action, we’re going to try and create a kiosk style image using the existing webkiosk example and run it on a Raspberry Pi 4 attached to a display.
Whilst the project documentation says it should be possible to run the tool on any Debian-based system regardless of architecture, the tool is developed and intended to be used on Raspberry Pi OS (64-bit). For the purposes of this exploration we will use a Pi 5, 4GB RAM with an NVMe for building images.
Assuming you’re starting with a blank copy of Raspberry OS Trixie Lite (64-bit), start by installing git, and cloning the rpi-image-gen repo into your workspace.
sudo apt update && sudo apt install git
git clone https://github.com/raspberrypi/rpi-image-gen.git
Now move into the repo, and run the dependency install script (~1min)
cd rpi-image-gen
sudo ./install_deps.sh
Now we should be able to build one of the default configurations, this will build a minimal Debian Bookworm image for a Raspberry Pi 4:
./rpi-image-gen build -c bookworm-minbase.yaml -- IGconf_device_layer=rpi4The first-time build took ~2 mins, which is impressive. We later ran this command on a Pi 4 with a microSD card and the same build took ~4 mins – still pretty good.
To understand what this command is doing, it can be useful to look at the contents of the bookworm-minbase.yaml config file (in configs/bookworm-minbase.yaml):
device:
    layer: rpi5
  image:
    layer: image-rpios
    boot_part_size: 200%
    root_part_size: 300%
    name: deb12-arm64-min
  layer:
    base: bookworm-minbase
Here you can see it specify what device to target, which image to use as well as some modifications to the size of each partition. These attributes are specified in the metadata of the lower layers, and can all be overridden. You can see this above where the device layer has been modified to rpi4 using IGconf_device_layer=rpi4.
There are a number of helpful example configurations in the examples directory. Handily they already have one for a webkiosk, so if we look at the contents of that, you can see it re-use the bookworm-minbase configuration from above, then extend it by including the example-kiosk layer, as well as configure the target url to the raspberry pi website.
include:
   file: bookworm-minbase.yaml
 image:
   root_part_size: 120%
   name: mykioskimage
 layer:
   app: example-kiosk
 kiosk:
   url: '"https://raspberrypi.com"'
If we take a step deeper into the example-kiosk layer, you can see it specifies that cage and chromium packages need to be installed, as well as setting environment variables for their kiosk service template.
METABEGIN
 X-Env-Layer-Name: example-kiosk
 X-Env-Layer-Category: example
 X-Env-Layer-Desc: Example webkiosk layer showing how to define configuration
 variables, declare packages and create a start up script. We depend on the
 RPi user creds layer as we want to run the kiosk as the user it creates, and
 we depend on systemd because we install a systemd service to start the kiosk.
 X-Env-Layer-Requires: rpi-user-credentials,systemd-net-min
 #
 X-Env-VarPrefix: kiosk
 #
 X-Env-Var-url: https://example.com
 X-Env-Var-url-Desc: Default URL the web kiosk will load at startup.
 X-Env-Var-url-Required: n
 X-Env-Var-url-Valid: regex:^https://[a-zA-Z0-9.-]+[a-zA-Z0-9]/?.*$
 X-Env-Var-url-Set: y
 # METAEND
 mmdebstrap:
   packages:
     - cage
     - chromium
   customize-hooks:
     - |
       export KIOSK_USER="$IGconf_device_user1"
       export KIOSK_RUNDIR="/home/$IGconf_device_user1"
       export KIOSK_URL="$IGconf_kiosk_url"
       export KIOSK_APP="/usr/bin/chromium $KIOSK_URL https://time.is/London --kiosk --noerrdialogs --disable-infobars --no-first-run --enable-features=OverlayScrollbar --start-maximized"
       envsubst < kiosk.service.tpl > $1/etc/systemd/system/kiosk.service
     - $BDEBSTRAP_HOOKS/enable-units "$1" kiosk
The section at the beginning of each file is used to describe and identify each layer, as well as setting up variables as well as their settings. This is a good example of using regex to validate a variable, preventing improper use later and potentially catching misconfigurations earlier.
To build this configuration, targeting a Pi 4 and using a custom URL and image name:
./rpi-image-gen build -S ./examples/webkiosk -c kiosk.yaml -- IGconf_device_layer=rpi4 IGconf_kiosk_url="https://www.thegoodpenguin.co.uk/" IGconf_image_name="penguin-kiosk"Here you can see the additional -S command line option. This tells rpi-image-gen to search this directory for configs/layers/assets first. As the kiosk.yaml file is nested within ./examples/webkiosk/config, it is detected automatically.
DEPLOY
 runner: in deploy
 runner: /workspace/rpi-image-gen/layer/base [run deploy.sh] [args /workspace/rpi-image-gen/work/deploy-v2.0.0-rc.1-74-gc6c1125]
 Installing assets…
 '/workspace/rpi-image-gen/work/image-penguin-kiosk/penguin-kiosk.img' -> '/workspace/rpi-image-gen/work/deploy-v2.0.0-rc.1-74-gc6c1125/penguin-kiosk.img'
 '/workspace/rpi-image-gen/work/image-penguin-kiosk/boot.vfat.sparse' -> '/workspace/rpi-image-gen/work/deploy-v2.0.0-rc.1-74-gc6c1125/boot.vfat.sparse'
 '/workspace/rpi-image-gen/work/image-penguin-kiosk/penguin-kiosk.img.sparse' -> '/workspace/rpi-image-gen/work/deploy-v2.0.0-rc.1-74-gc6c1125/penguin-kiosk.img.sparse'
 '/workspace/rpi-image-gen/work/image-penguin-kiosk/root.ext4.sparse' -> '/workspace/rpi-image-gen/work/deploy-v2.0.0-rc.1-74-gc6c1125/root.ext4.sparse'
 '/workspace/rpi-image-gen/work/image-penguin-kiosk/image.json' -> '/workspace/rpi-image-gen/work/deploy-v2.0.0-rc.1-74-gc6c1125/image.json'
 '/workspace/rpi-image-gen/work/chroot-v2.0.0-rc.1-74-gc6c1125/filesystem-v2.0.0-rc.1-74-gc6c1125.sbom' -> '/workspace/rpi-image-gen/work/deploy-v2.0.0-rc.1-74-gc6c1125/filesystem-v2.0.0-rc.1-74-gc6c1125.sbom'
 '/workspace/rpi-image-gen/work/chroot-v2.0.0-rc.1-74-gc6c1125/manifest' -> '/workspace/rpi-image-gen/work/deploy-v2.0.0-rc.1-74-gc6c1125/manifest'
 '/workspace/rpi-image-gen/work/chroot-v2.0.0-rc.1-74-gc6c1125/config.yaml' -> '/workspace/rpi-image-gen/work/deploy-v2.0.0-rc.1-74-gc6c1125/config.yaml'
 Creating manifest…
 runner: out deploy
 pi@pi5:/workspace/rpi-image-gen $ ls work/image-penguin-kiosk/
 boot.vfat  boot.vfat.sparse  genimage.cfg  image.json  img_uuids  penguin-kiosk.img  penguin-kiosk.img.sparse  provisionmap.json  root.ext4  root.ext4.sparse
You should now have a disk image at work/image-penguin-kiosk/penguin-kiosk.img that can be flashed to a microSD card or used in rpi-sb-provisioner.
Scaling up production with rpi-sb-provisioner
Production devices require enabled hardware security features before deployment. However, manually preparing each device is time-consuming and prone to human-error. rpi-sb-provisioner automates this entire workflow, taking a blank device to a fully provisioned state in minutes.
Designed to run on a dedicated device (they recommend a Pi 5), it supports three provisioning security levels:
- naked – Just installs the OS to the disk (no encryption, no secure boot)
- fde-only – Encrypted storage + device-unique keys (no secure boot)
- secure-boot – Full secure boot enforcement + Encrypted storage + device-unique keys
The tool simplifies the complex process of fuse management, filesystem encryption, and OS installation. Beyond the initial flash, rpi-sb-provisioner maintains a manufacturing database of hardware statuses, encryption keys, and audit logs. It also offers an HTTP REST API for integration into existing manufacturing systems.
Their excellent Scaling Guide for Mass Production covers how to get the most out a small scale setup (1-50 devices) and up to large scale (500+) operations.
Connection methods vary by device (usually via USB to a Compute Module IO board or USB-C on standard Pis). Refer to the official Device Guide for cabling specifics for your device.
It can be installed via apt or by installing the latest release directly from the GitHub repository
sudo apt install rpi-sb-provisioneror
wget https://github.com/raspberrypi/rpi-sb-provisioner/releases/download/v2.1.1/rpi-sb-provisioner_2.1.1_arm64.deb
sudo apt install ./rpi-sb-provisioner_2.1.1_arm64.deb
Configuration and monitoring can now be handled via a web UI running on port 3142 (π rounded, nice choice).
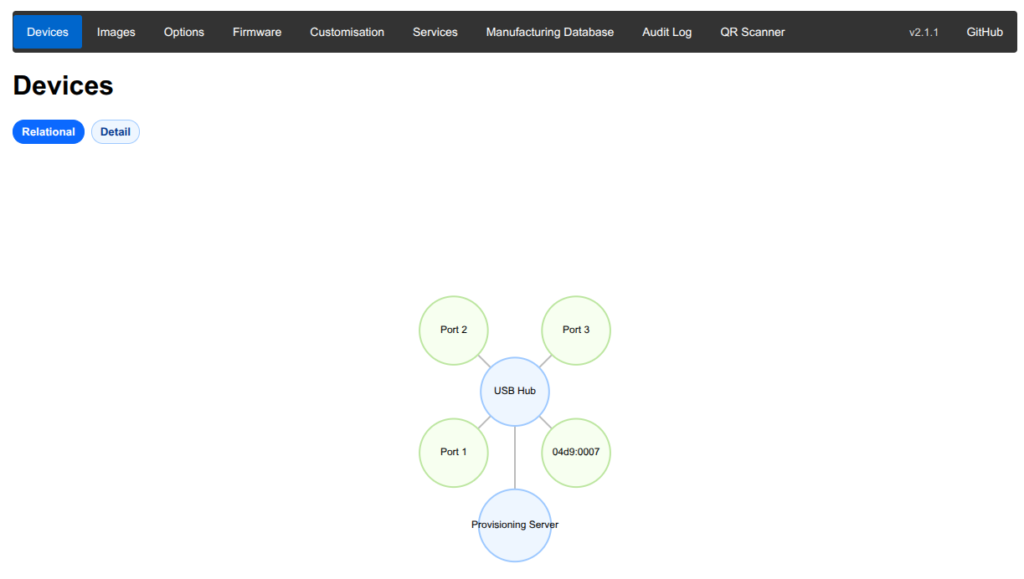
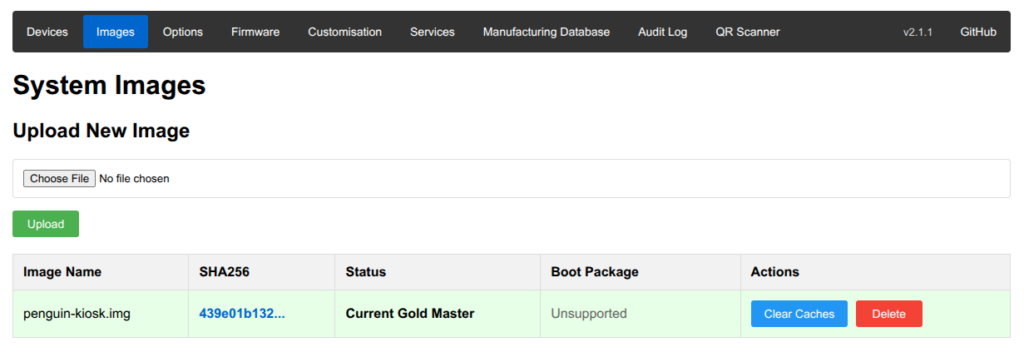
The Devices page displays a map of the USB devices that are currently connected. We want to configure rpi-sb-provisioner to setup our penguin-kiosk.img we generated earlier. To do that, go to the images tab, select the penguin-kiosk.img we generated earlier, and click upload.
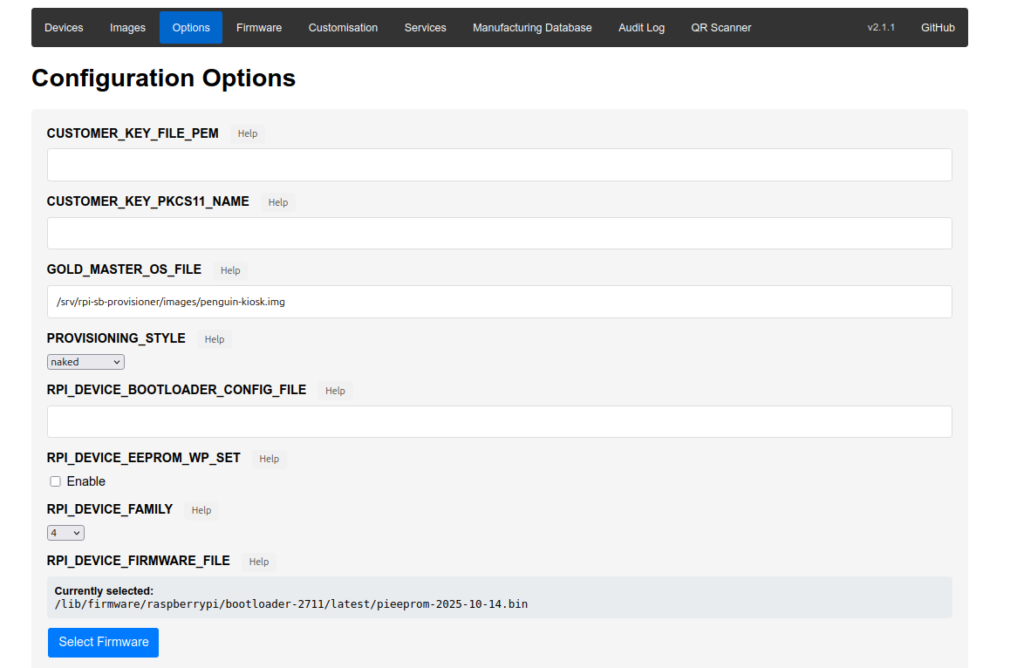
Now that we’ve set a “Gold-Master” disk image to use, go to the Options tab, and verify that the correct GOLD_MASTER_OS_FILE, PROVISIONING_STYLE, RPI_DEVICE_FAMILY and RPI_DEVICE_FIRMWARE_FILE are configured correctly. For now we’ll just use naked provisioning, as this is just a test.
As I am using a Pi 4B as my target device, I followed the instructions in the Raspberry Pi 4 Connection Guide to setup using GPIO 8 as the RPI-BOOT pin. This is specific to using this hardware, so depending on your setup check the Connecting your Device guide.
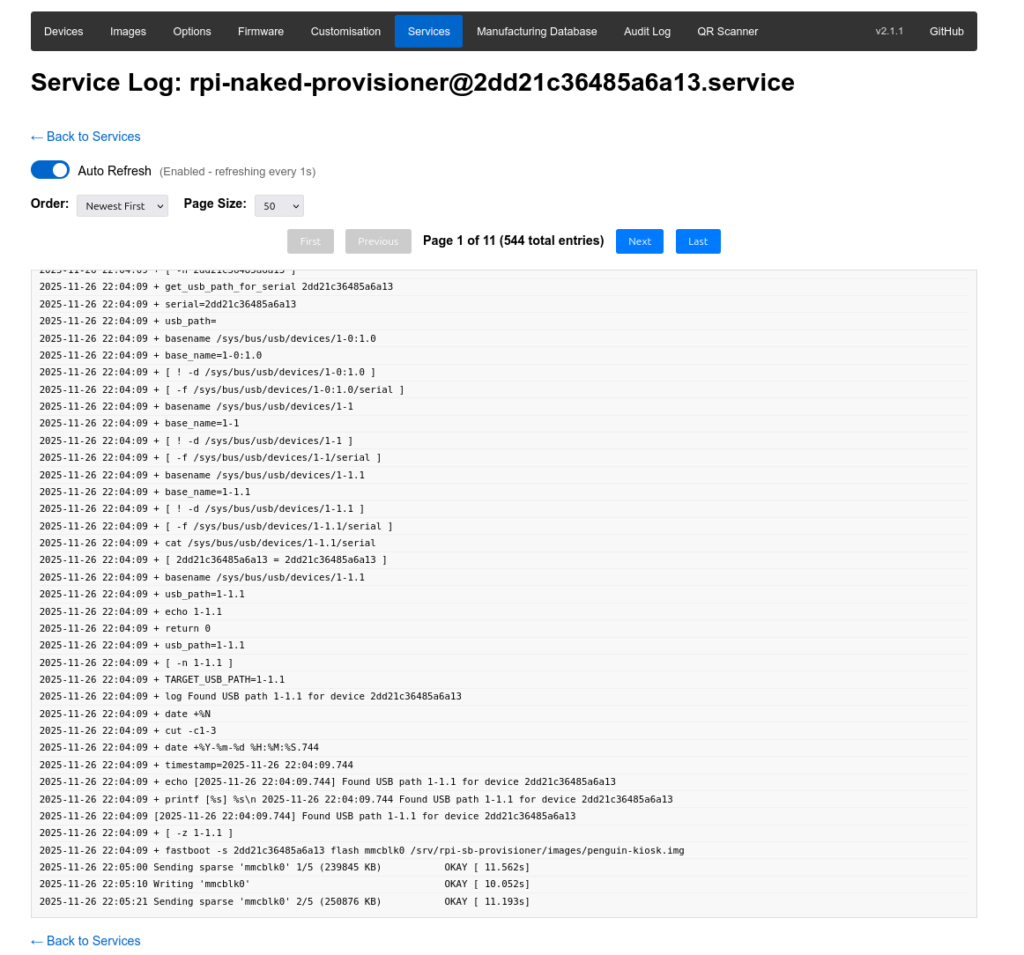
When you begin the flashing process, the Services tab will show the progress. Here you can see the “naked” provisioner writing the penguin-kiosk image.
After the provisioning is finished, disconnect it from the provisioner, power it on, and you should be presented with our wonderful website. Voilà
