When developing software it can be a real challenge to consistently deliver new features on time and without regressions. It can often feel like development gets stuck at the point of trying to get a new release out of the door with mountains of issues suddenly appearing. In an effort to improve development velocity many companies have turned to DevOps (e.g. CI/CD) and Agile practices (e.g. Scrum) with success.
However, when developing software for embedded devices, it’s not trivial to apply some of these practices (such as automated testing) and thus there is room for improvement. Ideally, before merging or delivering new software features, it would be beneficial to use a CI/CD pipeline to build, flash and boot the software on the device and then run tests. After all, many of the benefits from CI/CD arise due to gaining confidence that what’s being delivered is good – how can that be achieved if you’re only relying on automation to verify it builds and still relying on humans to fully test the far reaching impact of their code changes?
Our solution has been to integrate the GitHub DevOps platform with our existing board farm thus allowing CI/CD pipelines to leverage the automation that our board farm provides. We’re able to plumb in our board farm to a customers existing GitHub repository which allows them to write test cases in their repo which are automatically run on their custom devices when required. This frees up the customer from the management of a board farm but still gives them a means to run hardware-in-loop testing via a familiar GitHub user interface (e.g. GitHub Actions). In this post we’re going to show how we can use CI/CD to build, flash, boot and test a Yocto build for the Raspberry Pi.
The first step is to associate our board farm with the GitHub repository, this is easily achieved by obtaining a token from the project’s Settings | Actions | Runners page. Once done it looks like this.
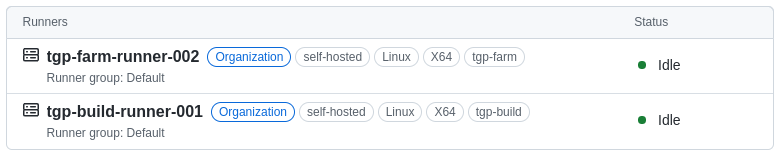
This shows that the repository has access to two GitHub ‘Runners‘ – runners are remote agents that will perform scripted CI steps. In this case we have a runner that is used for building and another runner that is used for interacting with customer hardware.
In order to use these runners we need to write a standard GitHub Actions ‘workflow‘ file and locate it in a .github directory at the root of the repository. This workflow file is a YAML file that describes the steps that should be taken by the runner. Let’s start by writing a workflow file that will be triggered when changes are pushed to the master branch:
name: RaspberryPi4_Yocto_CI

# Run on changes to master
on:
   push:
      branches: [ "master" ]
Next we need to make it do something useful, so let’s add a job that will build Yocto:
jobs:
   Build_Yocto:
      # Run on TGP build server
      runs-on: tgp-build

      # Specify location to build, this path persists across builds allowing
      # us to build incrementally
      env:
         BUILD_DIR: ${{github.workspace}}/non-volatile

      # Use container that has a non root user and typical Yocto dependencies
      # preinstalled
      container:
         image: thegoodpenguin/yocto:20.04

      steps:
         # Checkout scripts used for testing
         - name: Checkout tgp-raspberrypi-ci
           uses: actions/checkout@v3
           with:
              path: ${{env.BUILD_DIR}}/tgp-raspberrypi-ci

        # Checkout meta-raspberrypi
         - name: Checkout meta-raspberrypi
           uses: actions/checkout@v3
           with:
              path: ${{env.BUILD_DIR}}/meta-raspberrypi
              repository: agherzan/meta-raspberrypi

         # Build Yocto for Raspberry Pi via Kas
         - name: Build meta-raspberrypi
           run: |
              cd $BUILD_DIR
              printf 'LICENSE_FLAGS_ACCEPTED = "synaptics-killswitch" ' >> meta-raspberrypi/conf/layer.conf
              cp tgp-raspberrypi-ci/boottest.yml meta-raspberrypi/
              kas build meta-raspberrypi/kas-poky-rpi.yml:meta-raspberrypi/boottest.yml

         # Preserve the build images
         - name: Upload Artifacts
           uses: actions/upload-artifact@v3
           with:
              name: wic_image
              path: ${{env.BUILD_DIR}}/build/tmp/deploy/images/raspberrypi4/*.wic*
This job runs inside a specified Docker container and will checkout the source from our repository, the source from the upstream meta-raspberrypi repository and then incrementally build it all by using kas. It will run this on our farm’s build server – however the ‘runs-on’ property could easily be changed to run it on GitHub’s own runners or a customers runner. Once built, the build artifacts are uploaded to GitHub’s artifact storage – this allows users to download them from the web interface and for other jobs in the same workflow to make use of them.
The generated Yocto image is a disk image designed to be booted from an SD card inserted in the Raspberry Pi. Let’s now add a job that will use our farm to write that image to the SD card:
   Flash_to_SDCard:
      runs-on: tgp-farm
      needs: Build_Yocto
      container: default

      steps:
         # Obtain the built image
         - name: Get artifacts
           uses: actions/download-artifact@v3
           with:
              name: wic_image

         # Write wic image to SD card
         - name: Flash artifacts
           run: |
              # Request exclusive use of RPI4 hardware
              bfmc use tgp-rpi4b --force

              # Obtain env variables for RPI4 device nodes
              eval `lsudt -b tgp-rpi4b -x`

              # Turn RPI4 off
              usbrelay ${TGP_RPI4B_PSU} 2 off

              # Give access to the RPI4's SD card to the farm
              sd-mux-ctrl -e tgp-rpi4 -s

              # Wait for disk to appear
              sleep 2

              # Obtain env variables for RPI4 disk nodes
              eval `lsudt -b tgp-rpi4b -x`

              # Write image to SD card
              bzcat /github/home/core-image-base-raspberrypi4.wic.bz2 | sudo dd of=${TGP_RPI4B_SD} bs=1M conv=nocreat
This job, which runs on our farm via our GitHub runner, makes use of the our farm’s ability to control the power to hardware and to perform SD Muxing. Our farm software is designed to simply arbitrate access to hardware and provide protected access to it as if it were on someone’s desk. In the above job we can see that our ‘bfmc’ utility is used to make available the Raspberry Pi 4 to this runner’s container. We then use the open-source ‘lsudt‘ utility to identify and label device nodes associated with the Raspberry Pi 4. We turn the Pi 4 off (via the use of a USB relay), use an SD-Mux to make available the Pi’s SD card to this container and then we finally write to the disk image to the SD card.
Now that we’ve build and flashed the Yocto image, let’s add a boot test to verify that we can get to a login prompt.
   PyTest_on_Pi:
      runs-on: tgp-farm
      needs: Flash_to_SDCard
      container: default

      steps:
         # Checkout scripts used for testing
         - name: Checkout tgp-raspberrypi-ci
           uses: actions/checkout@v3
           with:
              path: tgp-raspberrypi-ci

         # Run tests
         - name: Tests
           run: |
              # Request exclusive use of RPI4 hardware
              bfmc use tgp-rpi4b --force

              # Obtain env variables for RPI4 device nodes
              eval `lsudt -b tgp-rpi4b -x`

              # Give SD card to RPI4
              sd-mux-ctrl -e tgp-rpi4 -d

              # Run tests
              pytest tgp-raspberrypi-ci/tests/ >> $GITHUB_STEP_SUMMARY
This time, after checking out our repository, the job will gain access to the Raspberry Pi, and then run the pytests that in our repository. We have a single test which looks like this:
import pexpect
import os

def test_boot():
    os.system(f'usbrelay {os.environ["TGP_RPI4B_PSU"]} 2 on')
    child = pexpect.spawn(f'picocom {os.environ["TGP_RPI4B_UART"]} -b 115200')
    child.send('')
    child.expect(['.*login.*', pexpect.EOF])
The test uses pexpect which turns the board on and then waits for a login prompt on the serial console. Thereby verifying that the checked in code will build, boot and flash. This is a trivial test, however much more useful tests can also be created – for example a product that records video to an SD card could be tested by triggering a recording (perhaps via a USB relay closing a button contact) and then verifying that the recording appears on an SD card and that the recording is valid (perhaps by checking file size, or running some tests via ffmpeg).
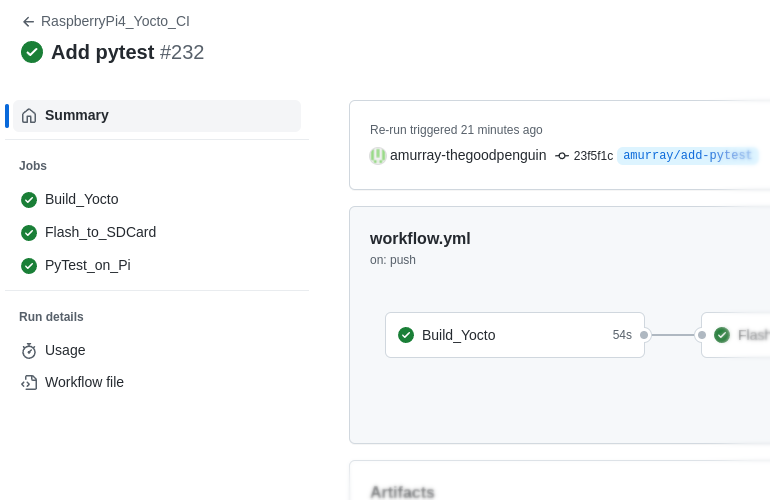
One of the benefits of using a DevOps platform such as GitHub is that it provides a rich and integrated user interface, for example here is the output for a run of our complete workflow:
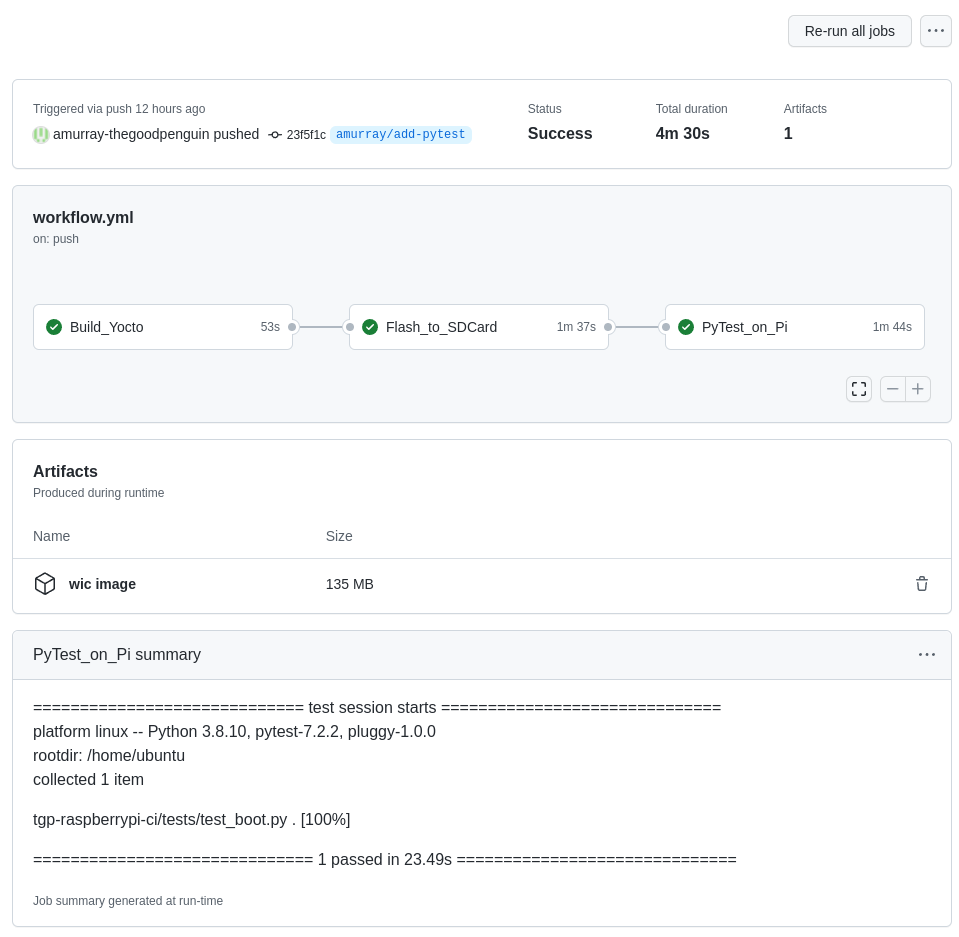
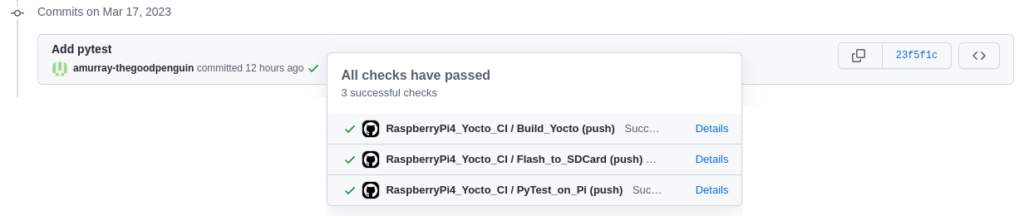
You’ll notice that the output captures the jobs within the workflow with colours indicating their success. It also provides access to any artifacts uploaded (in this case our wic image) and includes the output from pytest. Of course access to logs of the builds and test runs are also provided. The pytest output was made accessible via use of the GitHub Actions GITHUB_STEP_SUMMARY variable in our last job – we’ve previously used this variable to output other interesting output obtained from running tests, for example performance metrics including boot time. We also like that when reviewing Git history, GitHub shows if tests have been run against each commit:
We developed our board farm to allow interactive access to our engineers for access to reference boards and to share limited customer hardware. However we’re now finding that our customers can also benefit from the automation that our farm provides – we take care of the management of the board farm and provide any physical automation or remote hands that are needed thus allowing our customers to write portable test code that can live in their own repositories. We’re currently working to open source parts of our farm and further improve our farm’s capabilities. Feel free to get in touch if we can be of assistance.