The well known /sys/class/gpio interface has been around since version 2.6.27 of the kernel – way back in 2008. It provides an easy to use, file-based means of accessing GPIO from user-space. In the embedded Linux space it’s commonly used by applications to directly interact with hardware and most engineers can probably recount times where they’ve interacted with it on the command line to validate or debug hardware. However the interface is deprecated and has been for quite some time (since 2015). So should we stop using it? Will the interface be removed? And what it’s replacement? Keep on reading to find out the answers.
The Linux kernel is always in development and the interfaces inside the kernel are often in flux – yet the community goes to great lengths to not ‘break user-space‘ and to ensure that binaries written years ago will continue to run – even on the latest kernels. There is good reasoning behind this which is discussed here and here. In fact there is also new kernel documentation being created that describes the various aspects surrounding regressions.
In 2015, the /sys/class/gpio interface was moved from ‘testing’ to ‘obsolete’ – indicating that the interface is obsolete and will be removed from the kernel in due course. The documentation was also updated to indicate “This ABI is deprecated and will be removed after 2020. It is replaced with the GPIO character device.“. It seems that this interface has its days numbered. However the sysfs interface part of the GPIO subsystem is self-contained, selectable via the CONFIG_GPIO_SYSFS KConfig option and probably not causing any upkeep issues. It’s hard to imagine that this interface will be removed in the near future.
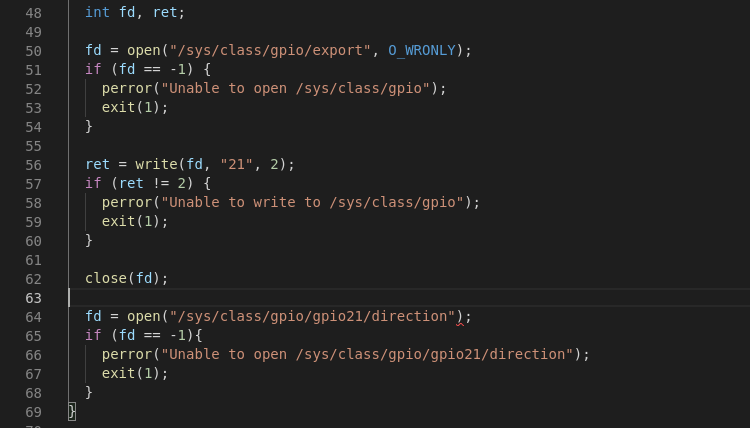
With the sysfs interface you could assert a GPIO through the following commands. (And if you wanted to do it in an application – your application or library would write to sysfs.)
$ echo 21 > /sys/class/gpio/export
$ echo out > /sys/class/gpio/gpio21/direction
$ echo 1 > /sys/class/gpio/gpio21/value
The main drawback of this approach is that users need to know the GPIO number for the pin that they want to toggle – this is a number allocated from the kernel’s GPIO ‘global integer namespace’ and is dependent on the order in which devices are detected. Therefore the number could easily change. Under the hood the kernel has moved away from this global integer namespace though it can’t be killed off completely until the sysfs interface is removed.
There are other issues as well – it’s inefficient (and a pain) having to write characters to so many files to change one GPIO pin. Also the interface is stateless – there is no way for a process to have exclusive control of a GPIO line.
The new interface was gradually introduced in versions 4.6 and 4.8 of the kernel and is exposed as a character device with an IOCTL based interface. A character device is created for each gpio chip found in the system and is located in /dev/gpiochipX. Unlike its sysfs predecessor the chardev interface is not optional. Thus if the kernel has support for GPIO (CONFIG_GPIOLIB) then the chardev interface will also be present.
As it’s a character based interface, you can no longer use tools such as cat and echo to toggle GPIOs – fortunately you can use libgpiod. This provides a C library with C++ and Python bindings – and several command line utilities (which acts as an example for how to use the library). Let’s take a closer look at these utilities – the gpiodetect utility provides a list of available chips on your system:
$ gpiodetect
gpiochip0 [30200000.gpio] (32 lines)
gpiochip1 [30210000.gpio] (32 lines)
gpiochip2 [30220000.gpio] (32 lines)
gpiochip3 [30230000.gpio] (32 lines)
gpiochip4 [30240000.gpio] (32 lines)
The first column represents name of the chip (also the device node name). The second column (in square brackets) is the device label which is normally set by the GPIO driver (this will match the value of /sys/class/gpio/gpiochipX/label). The last column shows how many GPIO lines the chip has.
The gpioinfo utility provides detailed information about each GPIO line. In the output below we provided the device label as an argument – though we could have passed in gpiochip0 or 0 to get the same output.
$ gpioinfo 30200000.gpio
gpiochip0 - 32 lines:
         line   0:      unnamed       unused   input  active-high
         line   1:      unnamed       unused   input  active-high
         line   2:      unnamed       unused   input  active-high
         line   3:      unnamed  "interrupt"   input  active-high [used]
         line   4:      unnamed       unused  output  active-high
         line   5:      unnamed     "status"  output  active-high [used]
         line   6:      unnamed       unused   input  active-high
         line   7:      unnamed      "reset"   input  active-high [used]
         line   8:      unnamed       unused   input  active-high
...
You’ll see from the output that for each GPIO chip, each of the available GPIO’s are listed along with their current user and configuration. The third column is the gpio label, though on our system the labels are unset (thus showing as ‘unnamed’). It’s possible to use the gpio-line-names property in the device-tree to give each GPIO line a name, as follows:
&gpio1 {
       gpio-line-names = "red_led", "blue_led", "green_led";
};
In this example we named the first 3 GPIO lines of this gpiochip to “red_led”, “blue_led” and “green_led”. We can now see this reflected in the output of gpioinfo.
$ gpioinfo
gpiochip0 - 32 lines:
         line   0:    "red_led"       unused   input  active-high
         line   1:   "blue_led"       unused   input  active-high
         line   2:  "green_led"       unused   input  active-high
         line   3:      unnamed  "interrupt"   input  active-high [used]
         line   4:      unnamed       unused  output  active-high
         line   5:      unnamed     "status"  output  active-high [used]
         line   6:      unnamed       unused   input  active-high
         line   7:      unnamed      "reset"   input  active-high [used]
         line   8:      unnamed       unused   input  active-high
...
The gpioset utility allows us to control the state of a GPIO line. The following command sets the second GPIO line (line 1 or “blue_led”) of the the 30200000.gpio chip (gpiochip0) to 1 (high).
$ gpioset --mode=wait 30200000.gpio 1=0
The gpiofind utility allows you to search for a gpio with a specific name, e.g:
$ gpiofind blue_led
gpiochip0 1
$ gpioset gpiochip0 1=1
Additional utilities include gpioget (for reading values) and gpiomon (for monitoring GPIO events).
It’s also worth pointing out that the kernel source tree also includes some utilities that make use of the chardev interface – they are gpio-event-mon, gpio-hammer, gpio-watch and lsgpio – they can be found here.
Whilst making use of the new interface, we came across some gotchas. With the chardev GPIO interface, the process which opens the devnode has exclusive use over the gpio lines it has requested and so when the process exits (or the file handle is closed) then the kernel considers its use finished. A note in the output of ‘gpioset’ mentions the following:
Note: the state of a GPIO line controlled over the character device reverts
to default when the last process referencing the file descriptor representing
the device file exits. This means that it's wrong to run gpioset, have it exit
and expect the line to continue being driven high or low. It may happen if
given pin is floating but it must be interpreted as undefined behavior.
It suggests that after you close the file handle, the kernel may ‘reset’ or ‘revert’ the GPIO pin to its default state. Whilst we haven’t observed this in practice (or verified it’s true), the above note implies that the state of a GPIO line is undefined after you close your handle. (This is why, for correctness, we included the –mode=wait argument in the gpioset command above).
Therefore if you have a start up script that writes to /sys/class/gpio, then replacing it with gpioset may not give the desired result – as soon as gpioset exits the state of the GPIO line may change.
The gpioinfo utility doesn’t show the value of the GPIO lines – and you can’t read them with gpioget if another process is using it as you’ll get a ‘Device or resource busy’ error (whereas you could with the /sys/class/gpio interface). It’s sometimes hard to remember that the chardev GPIO interface isn’t stateless – it’s easy to think you can type ‘gpioset 0 1=0’ and then expect ‘gpioget 0 1’ to return 0. However assuming chardev doesn’t reset the state when you close the file handle, gpioget will reconfigure the GPIO line to an input before sampling the value – but in this case you probably wanted to verify that the output value was set as expected. (Update: since April 2021 there is an option to avoid this in gpioget.)
The new GPIO chardev interface provides many benefits, notably the ability to lookup GPIO lines and controllers by name instead of number, a clean programmatic access via IOCTLs and a set of helpful utilities. The new API also provides additional features that are not available with sysfs (such as accessing multiple GPIOs at the same time – and configuring pin properties). However if you’re transitioning from /sys/class/gpio then you may come across some gotchas.
So, should you move to the new interface? For new code – we think so. Though it may also be a good opportunity to question if you should be interfacing with GPIO from user-space in the first place. Many GPIOs are used for button input or to control LEDs – however it’s trivial to plumb these into the gpio-keys framework and gpio-leds framework via the device tree. In fact the kernel documentation provides a big list of existing drivers available for common GPIO tasks. This results in your application using standard kernel interfaces – thus decoupling your application from the specifics of the current hardware. But of course we live in the real world and there is nothing more convenient that controlling GPIO from user-space.